> ## Documentation Index
> Fetch the complete documentation index at: https://docs.gradingpal.com/llms.txt
> Use this file to discover all available pages before exploring further.
# Enroll Students to My Class
> Multiple ways to add students to your GradingPal class
There are several ways to add students to your class in GradingPal. Choose the method that works best for your classroom setup.
***
## Option 1: Share a Class Code
Every class has a unique join code that students can use to enroll themselves.
### Find Your Class Code
You can access the class join code from two places:
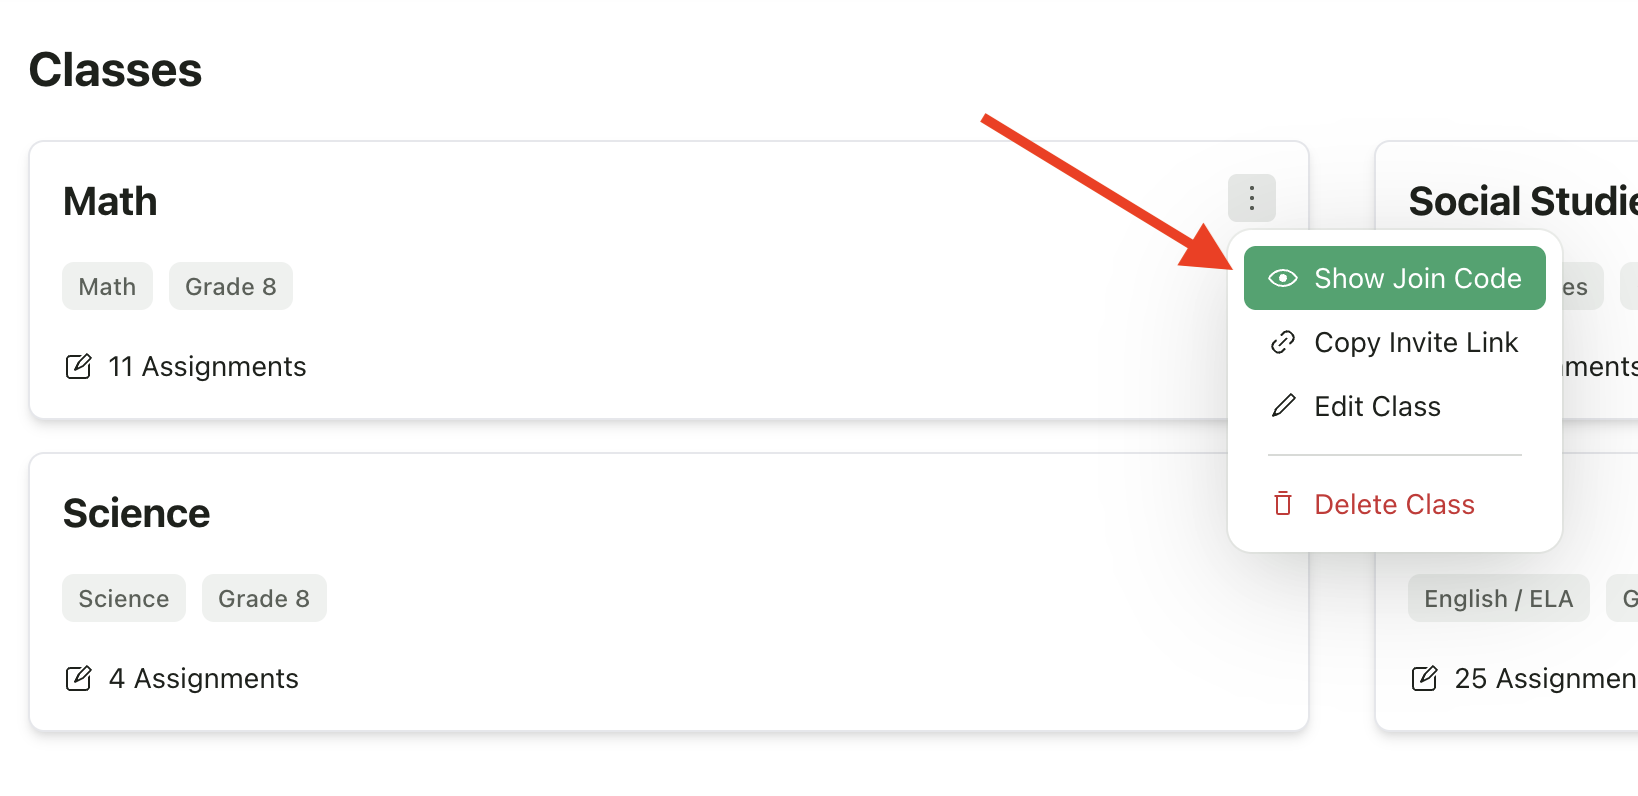
**From the Home Dashboard:**
1. Find your class on the dashboard
2. Click the **options menu** (three dots) on the class card
3. Select **Show Join Code**
 **From the Students Page:**
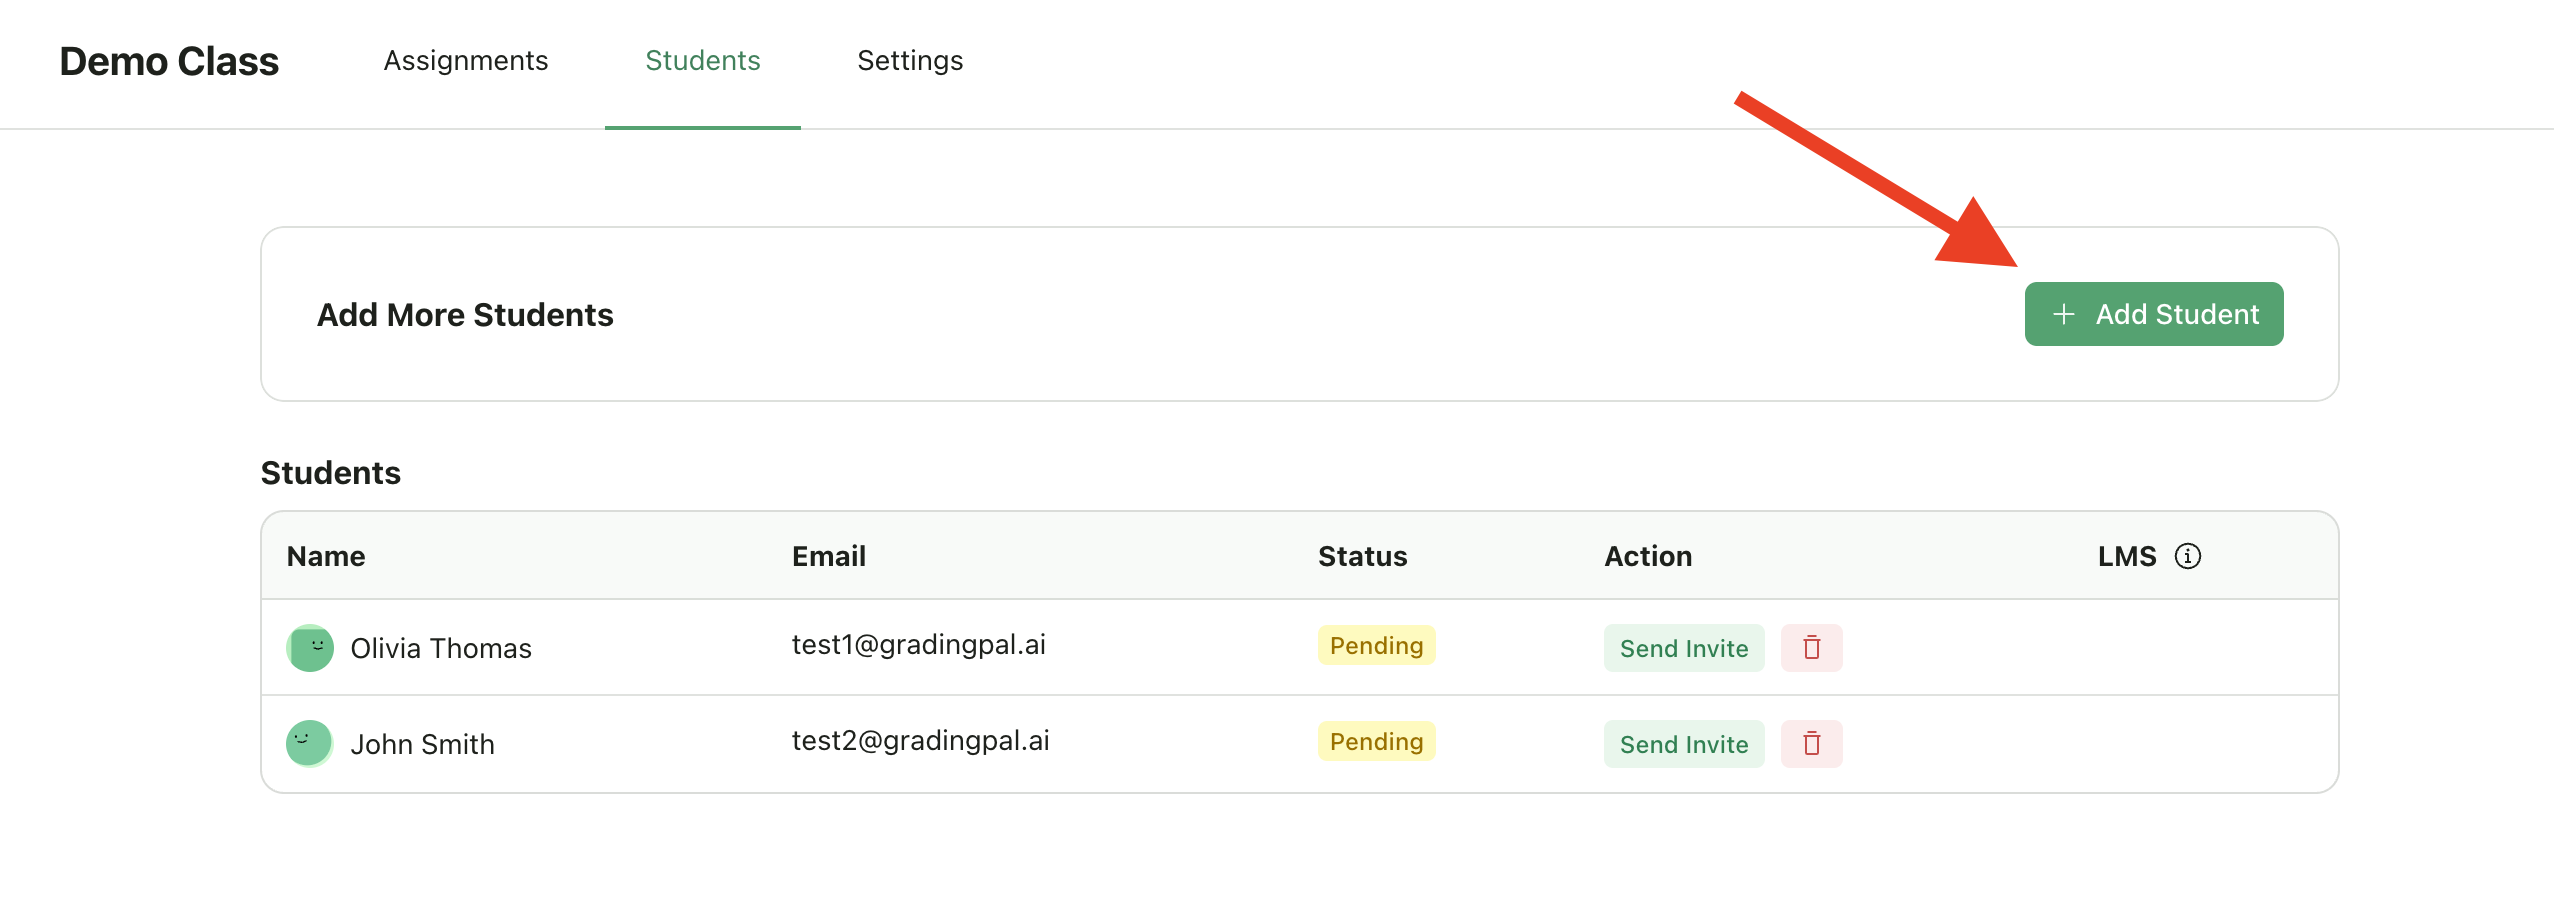
1. Open your class and go to the **Students** tab
2. Click **Add Students**
3. Select **Show Join Code**
**From the Students Page:**
1. Open your class and go to the **Students** tab
2. Click **Add Students**
3. Select **Show Join Code**
 ### Share the Code with Students
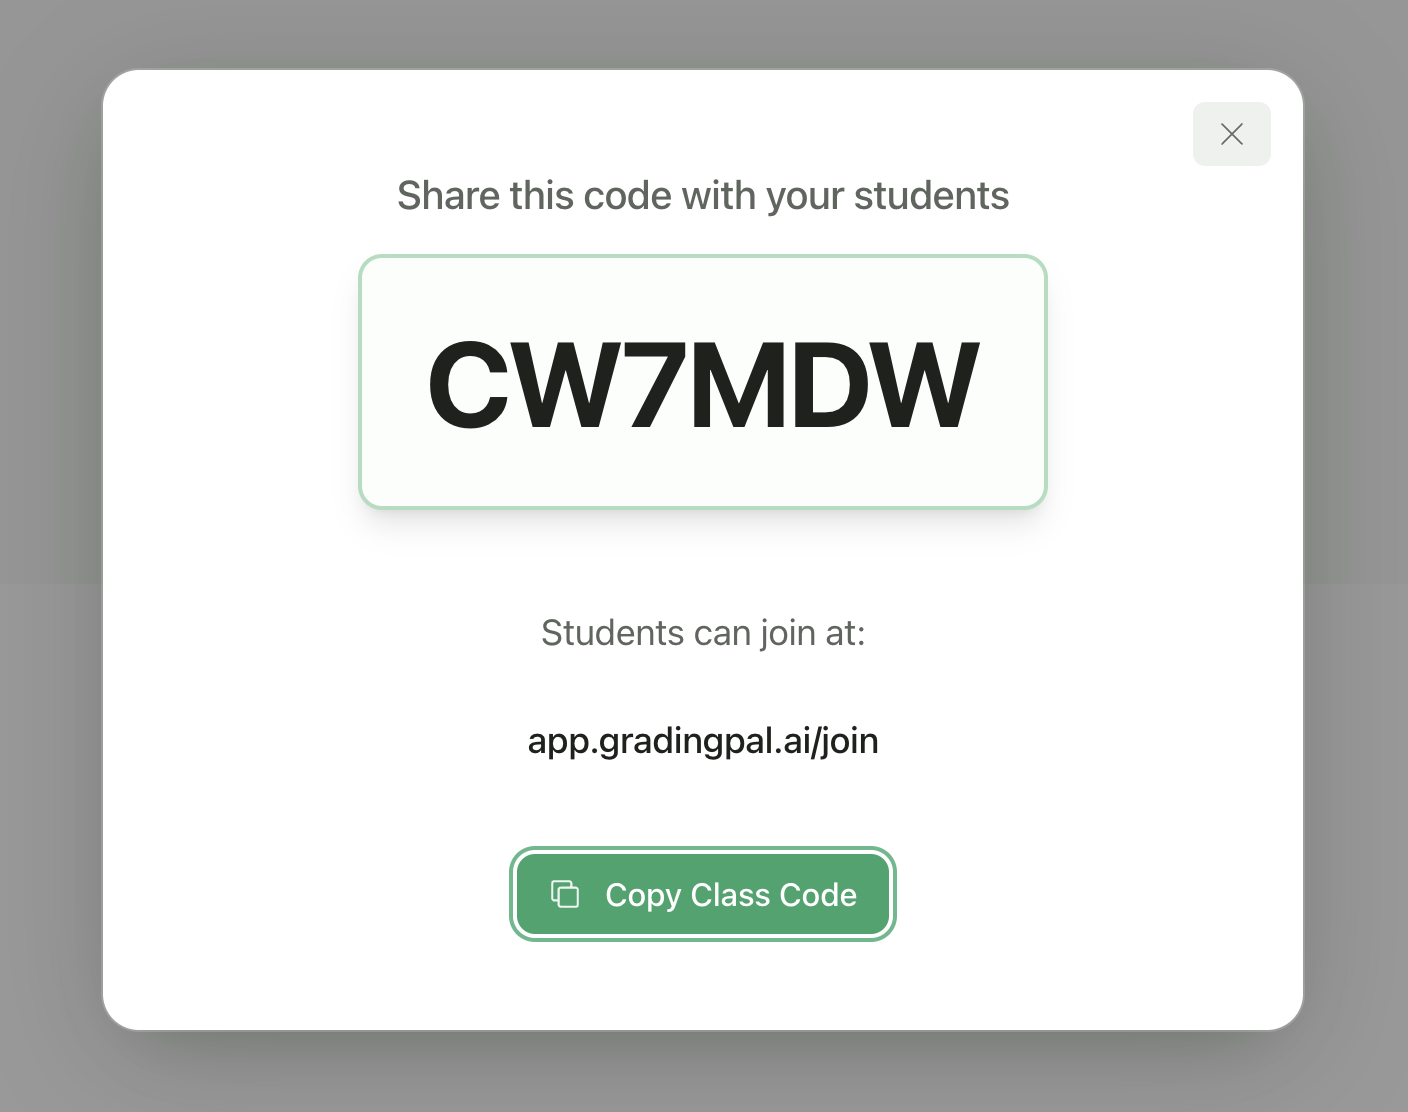
The join code dialog displays the code in a large, easy-to-read format that you can project or share with your class.
### Share the Code with Students
The join code dialog displays the code in a large, easy-to-read format that you can project or share with your class.
 ### How Students Join
Students go to **app.gradingpal.ai/join**
Enter the class code
Sign up or log in to their GradingPal account
They're automatically enrolled in your class
***
## Option 2: Copy Invite Link
Get a shareable link that students can use to join your class.
### Steps
1. Open your class and go to the **Students** tab
2. Click **Add Students**
3. Select **Copy Invite Link**
4. The link is copied to your clipboard—share it via your preferred method (LMS, chat, website, etc.)
### How Students Join
Students go to **app.gradingpal.ai/join**
Enter the class code
Sign up or log in to their GradingPal account
They're automatically enrolled in your class
***
## Option 2: Copy Invite Link
Get a shareable link that students can use to join your class.
### Steps
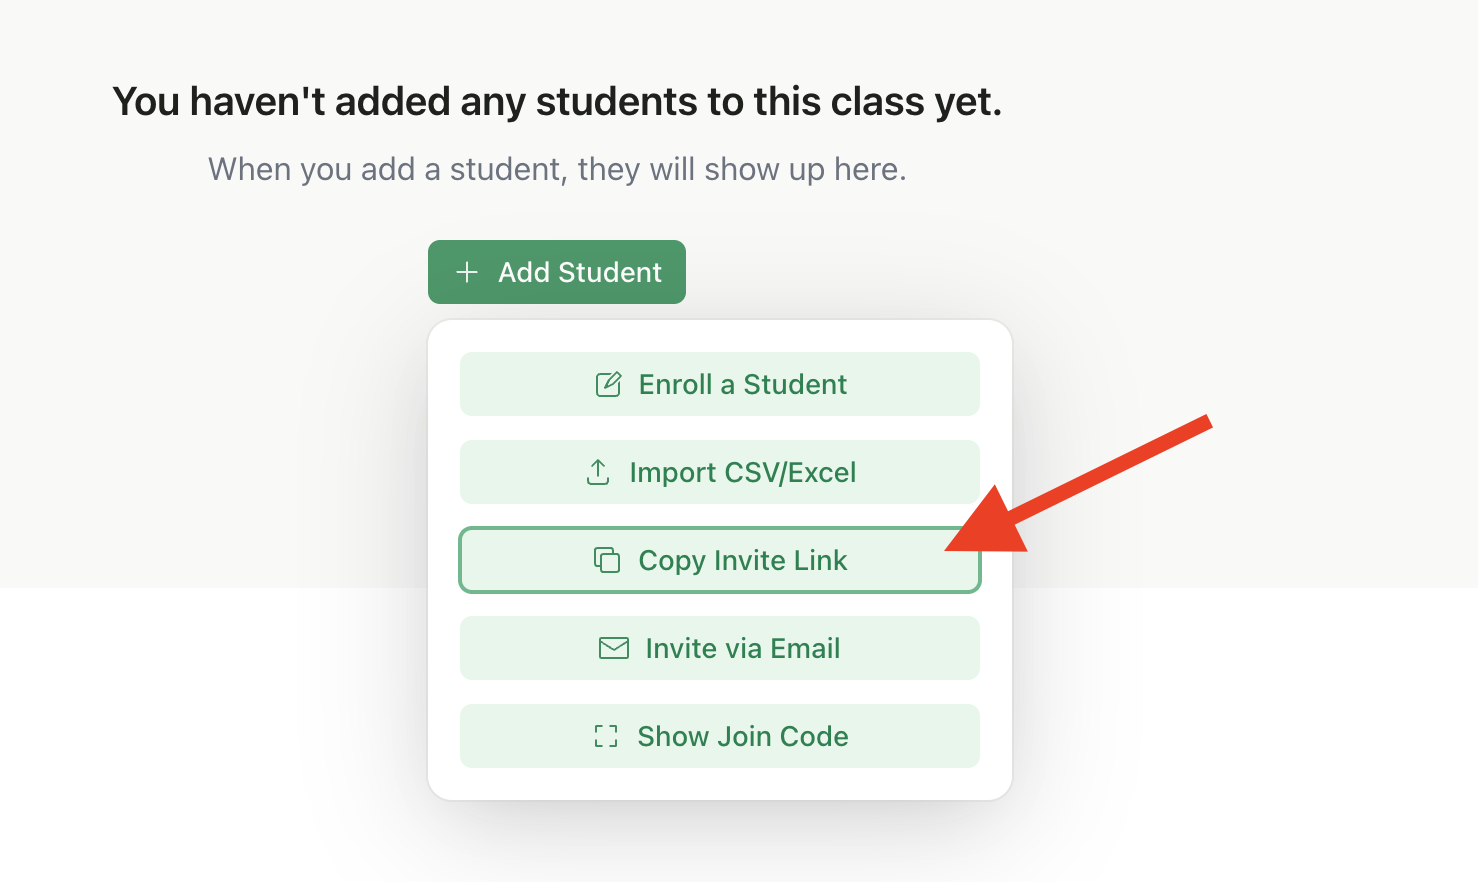
1. Open your class and go to the **Students** tab
2. Click **Add Students**
3. Select **Copy Invite Link**
4. The link is copied to your clipboard—share it via your preferred method (LMS, chat, website, etc.)
 When students click the link, they'll be prompted to sign up or log in, then automatically enrolled in your class.
***
## Option 3: Send Email Invitations
Send invitation emails directly to your students. They'll receive a link to join your class.
### Steps
Open your class and go to the **Students** tab, then click **Add Students**
Select **Invite via Email**
Enter student email addresses, separated by commas, spaces, or semicolons
Click **Send invitations**
When students click the link, they'll be prompted to sign up or log in, then automatically enrolled in your class.
***
## Option 3: Send Email Invitations
Send invitation emails directly to your students. They'll receive a link to join your class.
### Steps
Open your class and go to the **Students** tab, then click **Add Students**
Select **Invite via Email**
Enter student email addresses, separated by commas, spaces, or semicolons
Click **Send invitations**
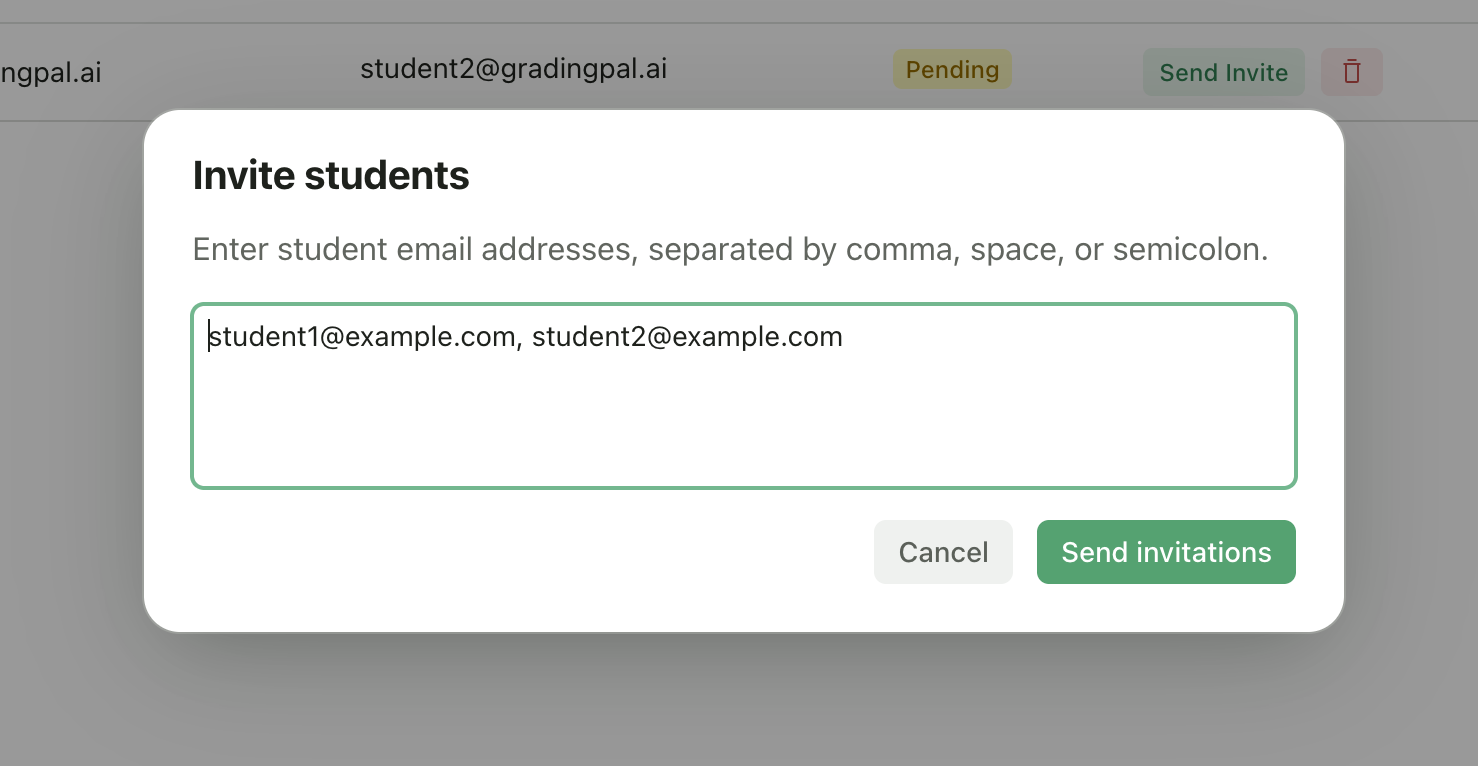 Students will receive an email with a link to join your class. If they already have a GradingPal account, they'll be enrolled immediately after clicking the link. New users will be prompted to create an account first.
### Tips for Email Invitations
* You can paste a list of emails from a spreadsheet
* Already-enrolled students will be skipped automatically
* You'll see a confirmation of how many invitations were sent
***
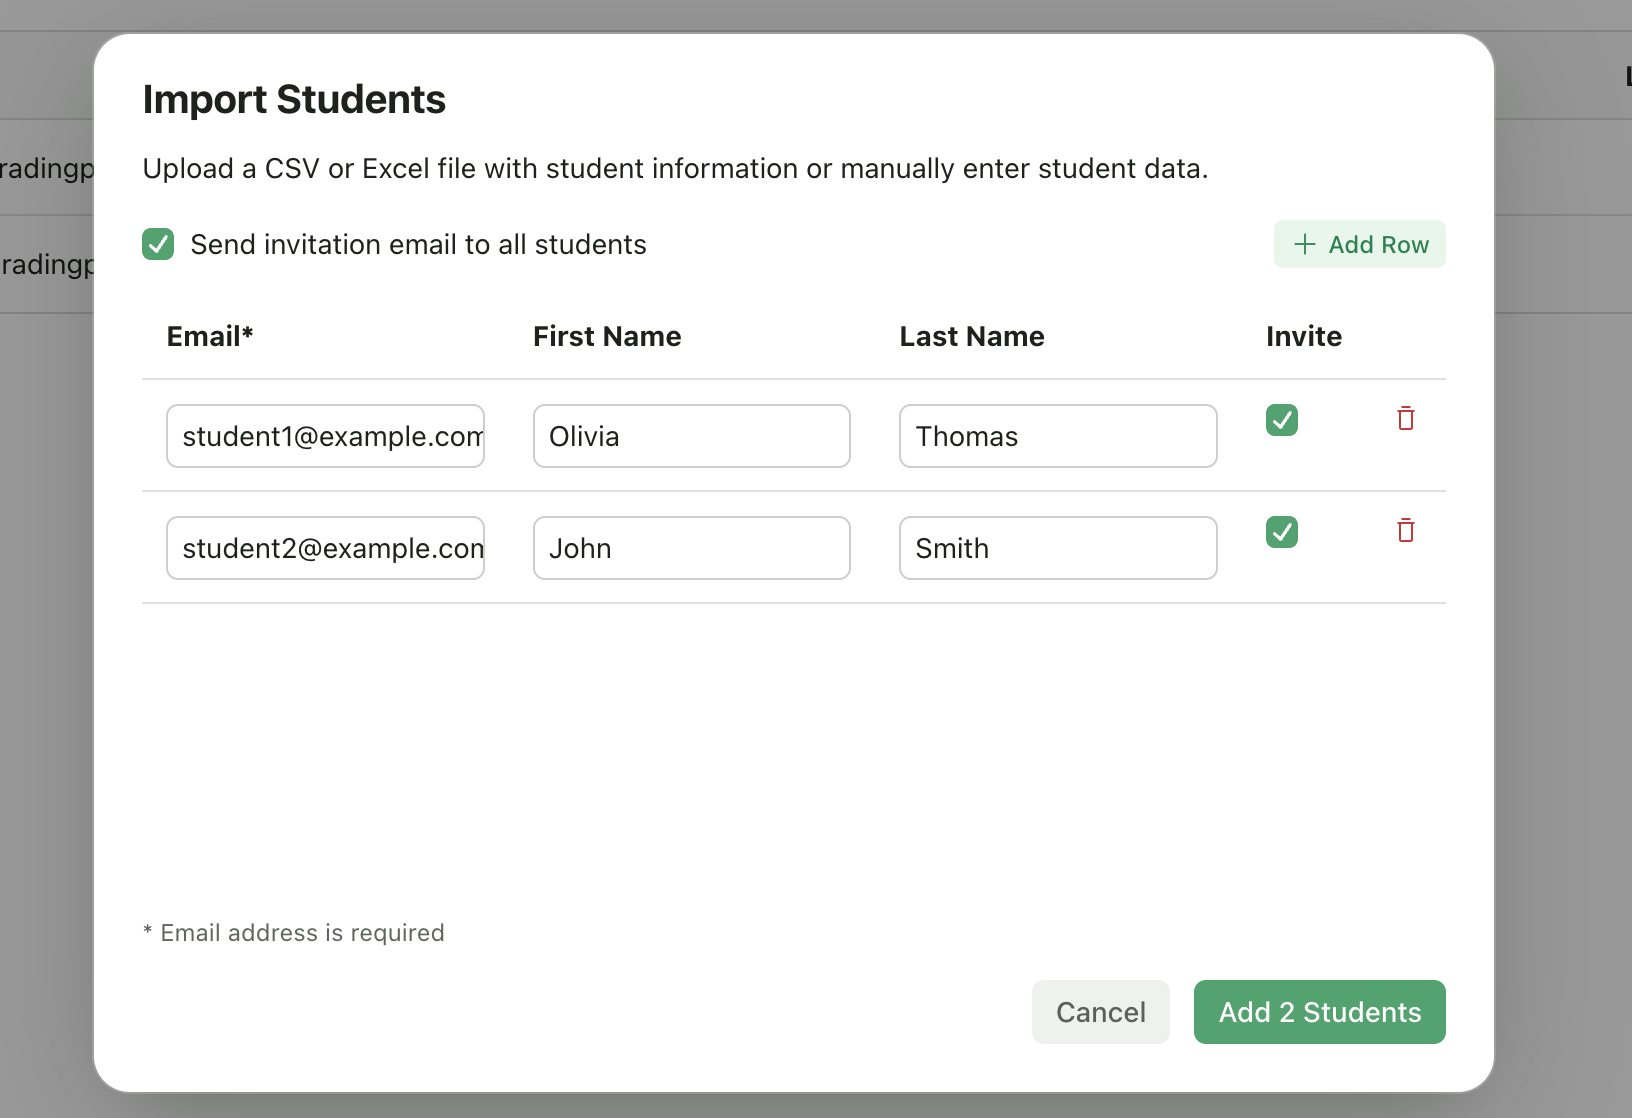
## Option 4: Import from CSV or Excel
Bulk import students from a spreadsheet file.
### Steps
Open your class → **Students** tab → **Add Students** → **Import from CSV/Excel**
Click **Select File** and choose your CSV or Excel file
Review the imported student list—you can edit names, emails, or remove rows
Toggle **Send invitation email to all students** if you want to notify them
Click **Add Students** to enroll them
Students will receive an email with a link to join your class. If they already have a GradingPal account, they'll be enrolled immediately after clicking the link. New users will be prompted to create an account first.
### Tips for Email Invitations
* You can paste a list of emails from a spreadsheet
* Already-enrolled students will be skipped automatically
* You'll see a confirmation of how many invitations were sent
***
## Option 4: Import from CSV or Excel
Bulk import students from a spreadsheet file.
### Steps
Open your class → **Students** tab → **Add Students** → **Import from CSV/Excel**
Click **Select File** and choose your CSV or Excel file
Review the imported student list—you can edit names, emails, or remove rows
Toggle **Send invitation email to all students** if you want to notify them
Click **Add Students** to enroll them
 ### File Format
Your CSV or Excel file should include student email addresses. First name and last name columns are optional but recommended.
| Column | Required | Example |
| -------------- | -------- | ----------------------------------------------- |
| **Email** | Yes | [student@school.edu](mailto:student@school.edu) |
| **First Name** | No | Jane |
| **Last Name** | No | Smith |
### Tips for Bulk Import
* You can edit any row after importing before adding students
* Add additional rows manually using the **Add Row** button
* Remove unwanted rows using the trash icon
* Control invitation emails per-student or toggle all at once
***
## Option 5: Add Students Manually
Add individual students by entering their information directly.
### Steps
1. Open your class
2. Click **Add Student**
3. Enter the student's email address (required)
4. Optionally enter their first and last name
5. Choose whether to send an email invitation
6. Click **Add student**
### File Format
Your CSV or Excel file should include student email addresses. First name and last name columns are optional but recommended.
| Column | Required | Example |
| -------------- | -------- | ----------------------------------------------- |
| **Email** | Yes | [student@school.edu](mailto:student@school.edu) |
| **First Name** | No | Jane |
| **Last Name** | No | Smith |
### Tips for Bulk Import
* You can edit any row after importing before adding students
* Add additional rows manually using the **Add Row** button
* Remove unwanted rows using the trash icon
* Control invitation emails per-student or toggle all at once
***
## Option 5: Add Students Manually
Add individual students by entering their information directly.
### Steps
1. Open your class
2. Click **Add Student**
3. Enter the student's email address (required)
4. Optionally enter their first and last name
5. Choose whether to send an email invitation
6. Click **Add student**
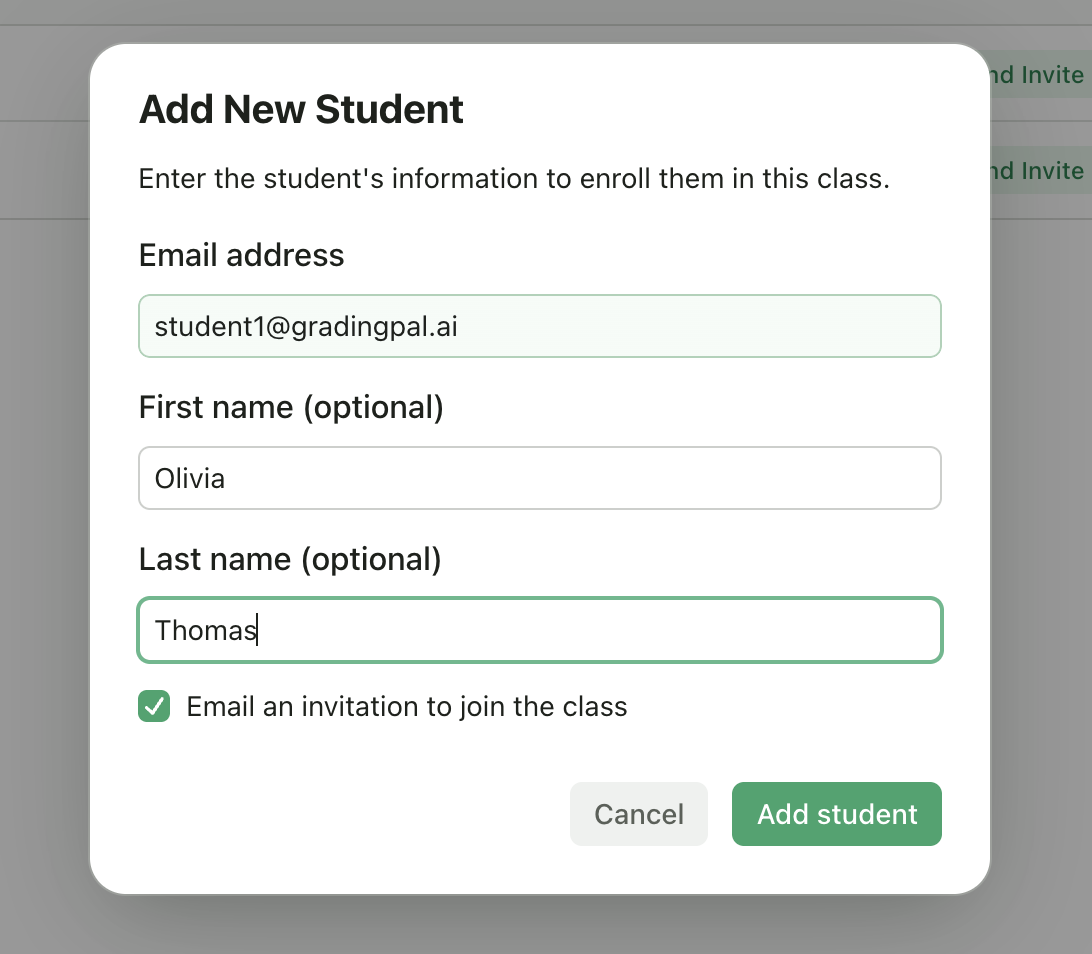 | Field | Required | Description |
| ------------------- | -------- | ----------------------------------------------------- |
| **Email address** | Yes | The student's email (used for login) |
| **First name** | No | Student's first name |
| **Last name** | No | Student's last name |
| **Send invitation** | Optional | Email the student a link to join (checked by default) |
### When to Use Manual Entry
* Adding a single student who joined late
* Creating placeholder entries for students who will submit work later (Teacher-Only Mode)
* When you have student names but they won't be creating accounts
***
## Option 6: Import from Google Classroom
If you imported your class from Google Classroom, your student roster syncs automatically.
Learn how Google Classroom sync works
***
## Managing Your Roster
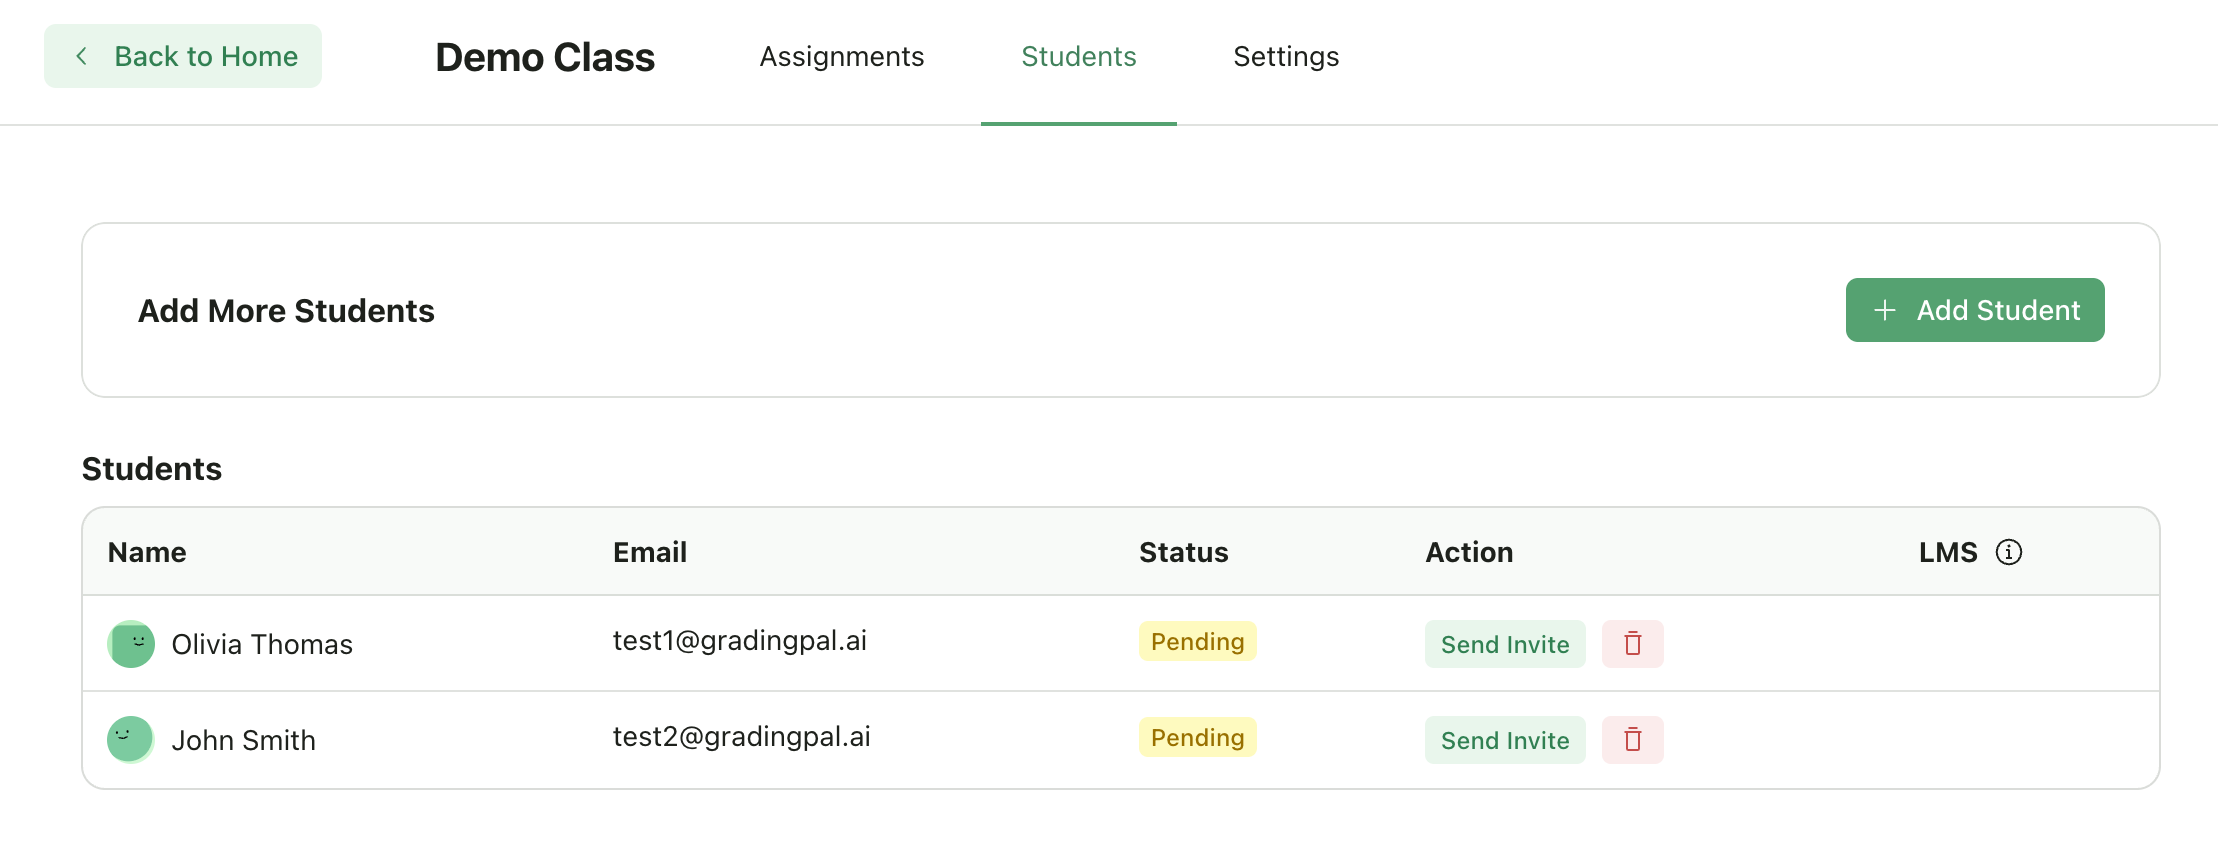
### View Enrolled Students
Navigate to your class to see all enrolled students, their email addresses, and their status.
| Field | Required | Description |
| ------------------- | -------- | ----------------------------------------------------- |
| **Email address** | Yes | The student's email (used for login) |
| **First name** | No | Student's first name |
| **Last name** | No | Student's last name |
| **Send invitation** | Optional | Email the student a link to join (checked by default) |
### When to Use Manual Entry
* Adding a single student who joined late
* Creating placeholder entries for students who will submit work later (Teacher-Only Mode)
* When you have student names but they won't be creating accounts
***
## Option 6: Import from Google Classroom
If you imported your class from Google Classroom, your student roster syncs automatically.
Learn how Google Classroom sync works
***
## Managing Your Roster
### View Enrolled Students
Navigate to your class to see all enrolled students, their email addresses, and their status.
 ### Student Status
Each student in your roster has one of two statuses:
| Status | What It Means |
| ----------- | --------------------------------------------------------------------------------------------------------- |
| **Pending** | The student has been added to the class by the teacher but hasn't signed up for a GradingPal account yet. |
| **Active** | The student has signed up and has an active account on GradingPal via the Student interface. |
#### What Teachers Can Do with Pending Students
When a student is in **Pending** status:
* ✅ You can upload submissions on their behalf
* ✅ You can grade their work
* ❌ The student cannot log in to view their grades or feedback
Once the student creates their GradingPal account using the same email address, their status changes to **Active** and they can access all their grades and feedback through the Student interface.
### Remove a Student
To remove a student from your class:
Go to the **Students** tab in your class
Find the student in the roster table
Click the **red trash icon** in the Action column
Type the student's email address to confirm
Click **Remove Student**
Removing a student will hide their submissions from view. Their submission data is preserved in the database, but you won't be able to see or grade their work once they're removed from the class.
***
## Troubleshooting
Direct them to **app.gradingpal.ai/join** and have them enter the class code exactly as shown.
* Check that the email address was entered correctly
* Ask them to check their spam/junk folder
* Try resending the invitation or share the class code instead
This means they've been added but haven't created a GradingPal account yet. They'll be fully enrolled once they sign up using the same email address.
***
## Related Articles
* [Create a New Class](/teacher/classes-and-students/create-a-new-class)
* [Class Settings](/teacher/classes-and-students/class-settings)
* [Google Classroom Integration](/teacher/lms-integrations/google-classroom)
* [Student Signup Guide](/student/create-student-account)
### Student Status
Each student in your roster has one of two statuses:
| Status | What It Means |
| ----------- | --------------------------------------------------------------------------------------------------------- |
| **Pending** | The student has been added to the class by the teacher but hasn't signed up for a GradingPal account yet. |
| **Active** | The student has signed up and has an active account on GradingPal via the Student interface. |
#### What Teachers Can Do with Pending Students
When a student is in **Pending** status:
* ✅ You can upload submissions on their behalf
* ✅ You can grade their work
* ❌ The student cannot log in to view their grades or feedback
Once the student creates their GradingPal account using the same email address, their status changes to **Active** and they can access all their grades and feedback through the Student interface.
### Remove a Student
To remove a student from your class:
Go to the **Students** tab in your class
Find the student in the roster table
Click the **red trash icon** in the Action column
Type the student's email address to confirm
Click **Remove Student**
Removing a student will hide their submissions from view. Their submission data is preserved in the database, but you won't be able to see or grade their work once they're removed from the class.
***
## Troubleshooting
Direct them to **app.gradingpal.ai/join** and have them enter the class code exactly as shown.
* Check that the email address was entered correctly
* Ask them to check their spam/junk folder
* Try resending the invitation or share the class code instead
This means they've been added but haven't created a GradingPal account yet. They'll be fully enrolled once they sign up using the same email address.
***
## Related Articles
* [Create a New Class](/teacher/classes-and-students/create-a-new-class)
* [Class Settings](/teacher/classes-and-students/class-settings)
* [Google Classroom Integration](/teacher/lms-integrations/google-classroom)
* [Student Signup Guide](/student/create-student-account)